In this blog post, I am describing the first steps I've taken to understand the BDD-Security framework that was developed by Stephen de Vries from Continuum Security.
BDD-Security is a security testing framework that uses Behaviour Driven Development concepts to create self-verifying security specifications.
The framework is essentially a set of Cucumber-JVM features that are pre-wired with Selenium/WebDriver, OWASP ZAP, SSLyze and Tennable's Nessus scanner.
It tests Web Applications and API's from an external point of view and does not require access to the target source code. The BDD-Security framework is open source and is hosted on GitHub.
To get started open a terminal and download RopeyTasks a vulnerable web application that we can run locally.
After executing the above commands, open your browser at http://localhost:8080 and you should be seeing the login form of the RopeyTask application.
Next, clone and run the latest version of BDD-Security in a new terminal.
This should have executed the authentication related tests against the Ropey Tasks application and failed the build with a similar error as shown below.
Let's explore the excerpt of the BDD-Security output and take a look at the generated reports.
In line 2 the name of the failed scenario is shown, in this case: "Scenario: Transmit authentication credentials over HTTPS", in line 5 we see the location of the generated report and in line 7 we see that the build failed.
This is great, but not very readable, especially when running a lot of test cases for different features.
When opening the referenced cucumber report in the browser (build/reports/cucumber/pretty/feature-overview.html), the results are visualised in a much more compelling way.

The first line contains the @authentication tag that we have specified when running bdd-security earlier. Another tag - @cwe-319-auth - is shown in line 5 and could be used to run this scenario by itself. If you look at some of the scenarios at the bottom you will see the @skip tag, which was specifically excluded in our initial run by using the --tag ~@tags command line switch.
In line 2 you see the name of the feature (Authentication) and in line 6 you can see one scenario (Transmit authentication credentials over HTTPS) that was also shown in the command line output earlier. Line 7-12 contain the steps for that scenario. To further dissect one of these step open the file bdd-security/src/test/java/net/continuumsecurity/steps/WebApplicationSteps.java
Line 6 of the WebApplicationSteps.java gist is the glue that ties Java code to the step definition in line 7 of the authentication.feature gist. At this stage, I recommend taking a few minutes to go through one whole scenario and understand how these steps are actually executed.
Equipped with the necessary knowledge about cucumber and bdd-security, we now take another look at the report and click on the Authentication feature link.
In this detailed report section, all of the executed scenarios are displayed. Those tests that have failed are marked as red and contain an explanatory message.
You might have wondered, how bdd-security was able to test the RopeyTask application including very specific authentication related tests without us having specified URLs, passwords and actual login flows. Let's solve this mystery by opening the bdd-security/config.xml file.
The config.xml file specifies all the necessary parameters for the test suite to run against a specific application. In line 3, the base URL is defined, which by default points to http://localhost:8080 where the RopeyTask application is running. Line 8 defines the cookie value that holds the sessionID and line 11/12 contain the default credentials used to login to the target application.
Line 5 specifies the Java file containing the Selenium steps required to perform some deep dive tests related to authentication and authorisation. The Java file can be found at bdd-security/src/test/java/net/continuumsecurity/examples/ropeytasks/RopeyTasksApplication.java.
I've extracted only two methods from that Java class, openLogin and login. These methods are called whenever a scenario executes the "When the default user logs in" step. The openLogin method browses to the login page and waits until it is rendered. For the RopeyTasks application, that page is http://localhost:8080/user/login. Once the page is loaded, it executes the login method that looks for the DOM element with the respective IDs username and password and then fills in the default username and password as specified in the config.xml file. Finally, it looks for the DOM element with the name _action_login and attempts to click that element. All of this corresponds to the actual HTML source of the RopeyTask login page.

Alright, we have a pretty good understanding of BDD-Security now and to further progress start making it work on another web application. WebGoat is the clear choice for that task, so dive into it.
Let's close the RopeyTask application, download WebGoat and fire it up.
Browse to http://localhost:8080/WebGoat/login.mvc to verify that WebGoat is running, then run the same command we have run in the beginning (./gradlew -Dcucumber.options="--tags @authentication --tags ~@skip" test). Finally, open the new cucumber report that was generated.

The generated report looks very different and in fact all the scenarios of the authentication feature have failed. Drilling down further, we can see that all of the scenarios failed at the same step - when the user is supposed to login to the application.

The error message states that there was a timeout when waiting for the element with the id username.
Let's fix that by modifying the BDD-Security defaults starting with the config.xml file.
Update the baseURL to point to the new WebGoat URL and make sure that there is a trailing forward slash. Change the class to point to the new file - we'll create this in a moment. Finally, modify the username and password to guest/guest, which are the defaults for WebGoat.
Before we write the Selenium steps we have to take a look at the HTML code of the WebGoat login page and identify the key elements that we have to modify. See underlined in red below.

Against best practices, the button tag doesn't contain an ID or Name, but we'll figure out a way to make the steps work anyway.
Create a new file at bdd-security/src/test/java/net/continuumsecurity/WebGoatApplication.java with the following content.
The method openLoginPage in line 20 is very straightforward and merely requires the name of the WebGoat login page (login.mvc) and the ID of an element that we expect to be rendered after the login page was called.
The method login can be copied from the RopeyTasksApplication.java for the most part. However, the button neither has a ID nor name, so we have to call it by naming the tag directly. This could be tricky if it's not the only button element on the page, but fortunately we can solve this issue like shown in line 32. The methods isLoggedIn and logout are required for the class to compile, but can be ignored for our current objective.
Now all that's left to do is run the tests (./gradlew -Dcucumber.options="--tags @authentication --tags ~@skip" test) and look at the results.

Excellent, most of the steps are passing now and the login step is now working as expected.

We have only scratched the surface of BDD-Security, but it is a really powerful tool. It is especially useful for codifying security requirements in a generic way and make it testable at runtime for a large range of applications. A proficient selenium user can probably translate the login functionality of an application in a few minutes. It is definitely not a silver-bullet, but provides a key foundation to automate the testing of security requirements and further empower QA folks.
I'm interested to know of any case studies where BDD-Security was used with a large portfolio and hear about any pros & cons that you have discovered.
What is BDD-Security?
BDD-Security is a security testing framework that uses Behaviour Driven Development concepts to create self-verifying security specifications.
The framework is essentially a set of Cucumber-JVM features that are pre-wired with Selenium/WebDriver, OWASP ZAP, SSLyze and Tennable's Nessus scanner.
It tests Web Applications and API's from an external point of view and does not require access to the target source code. The BDD-Security framework is open source and is hosted on GitHub.
Getting Started
To get started open a terminal and download RopeyTasks a vulnerable web application that we can run locally.
After executing the above commands, open your browser at http://localhost:8080 and you should be seeing the login form of the RopeyTask application.
Next, clone and run the latest version of BDD-Security in a new terminal.
This should have executed the authentication related tests against the Ropey Tasks application and failed the build with a similar error as shown below.
Let's explore the excerpt of the BDD-Security output and take a look at the generated reports.
In line 2 the name of the failed scenario is shown, in this case: "Scenario: Transmit authentication credentials over HTTPS", in line 5 we see the location of the generated report and in line 7 we see that the build failed.
This is great, but not very readable, especially when running a lot of test cases for different features.
When opening the referenced cucumber report in the browser (build/reports/cucumber/pretty/feature-overview.html), the results are visualised in a much more compelling way.

The ratio of failed/passed steps and scenarios is shown with clear graphs and more importantly feature statistics are given. If you think back to the command that we have run we specified to only run the authentication feature through the command line switch --tag @authentication. The authentication feature apparently consists of 5 scenarios that consist of 30 steps.
Features, Scenarios, Steps and Tags
Before we continue, let's understand cucumber and its terminology better. These four terms come from cucumber, which BDD-Security is built on. In the context of BDD-Security the terms are to be understood as follows:
- Feature: A feature groups related scenarios such as scenarios related to authentication. A contains a list of scenarios.
- Scenario: A scenario consists of multiple steps that start with a specific keyword. The first step of a scenario must always have the Given keyword.
- Steps: A step can start with any of the supported keywords which are Given, When, Then, But or And. Each step has an according step definition written in Java that contains the actual logic.
- Tags: Meta tags are a useful way to organise features and scenarios in a meaningful way.
With this understanding, we can take a quick peek under the hood of BDD-Security.
Locate the file bdd-security/src/test/resources/features/authentication.feature and explore the content.
The first line contains the @authentication tag that we have specified when running bdd-security earlier. Another tag - @cwe-319-auth - is shown in line 5 and could be used to run this scenario by itself. If you look at some of the scenarios at the bottom you will see the @skip tag, which was specifically excluded in our initial run by using the --tag ~@tags command line switch.
In line 2 you see the name of the feature (Authentication) and in line 6 you can see one scenario (Transmit authentication credentials over HTTPS) that was also shown in the command line output earlier. Line 7-12 contain the steps for that scenario. To further dissect one of these step open the file bdd-security/src/test/java/net/continuumsecurity/steps/WebApplicationSteps.java
Line 6 of the WebApplicationSteps.java gist is the glue that ties Java code to the step definition in line 7 of the authentication.feature gist. At this stage, I recommend taking a few minutes to go through one whole scenario and understand how these steps are actually executed.
Analysing the cucumber report
Equipped with the necessary knowledge about cucumber and bdd-security, we now take another look at the report and click on the Authentication feature link.
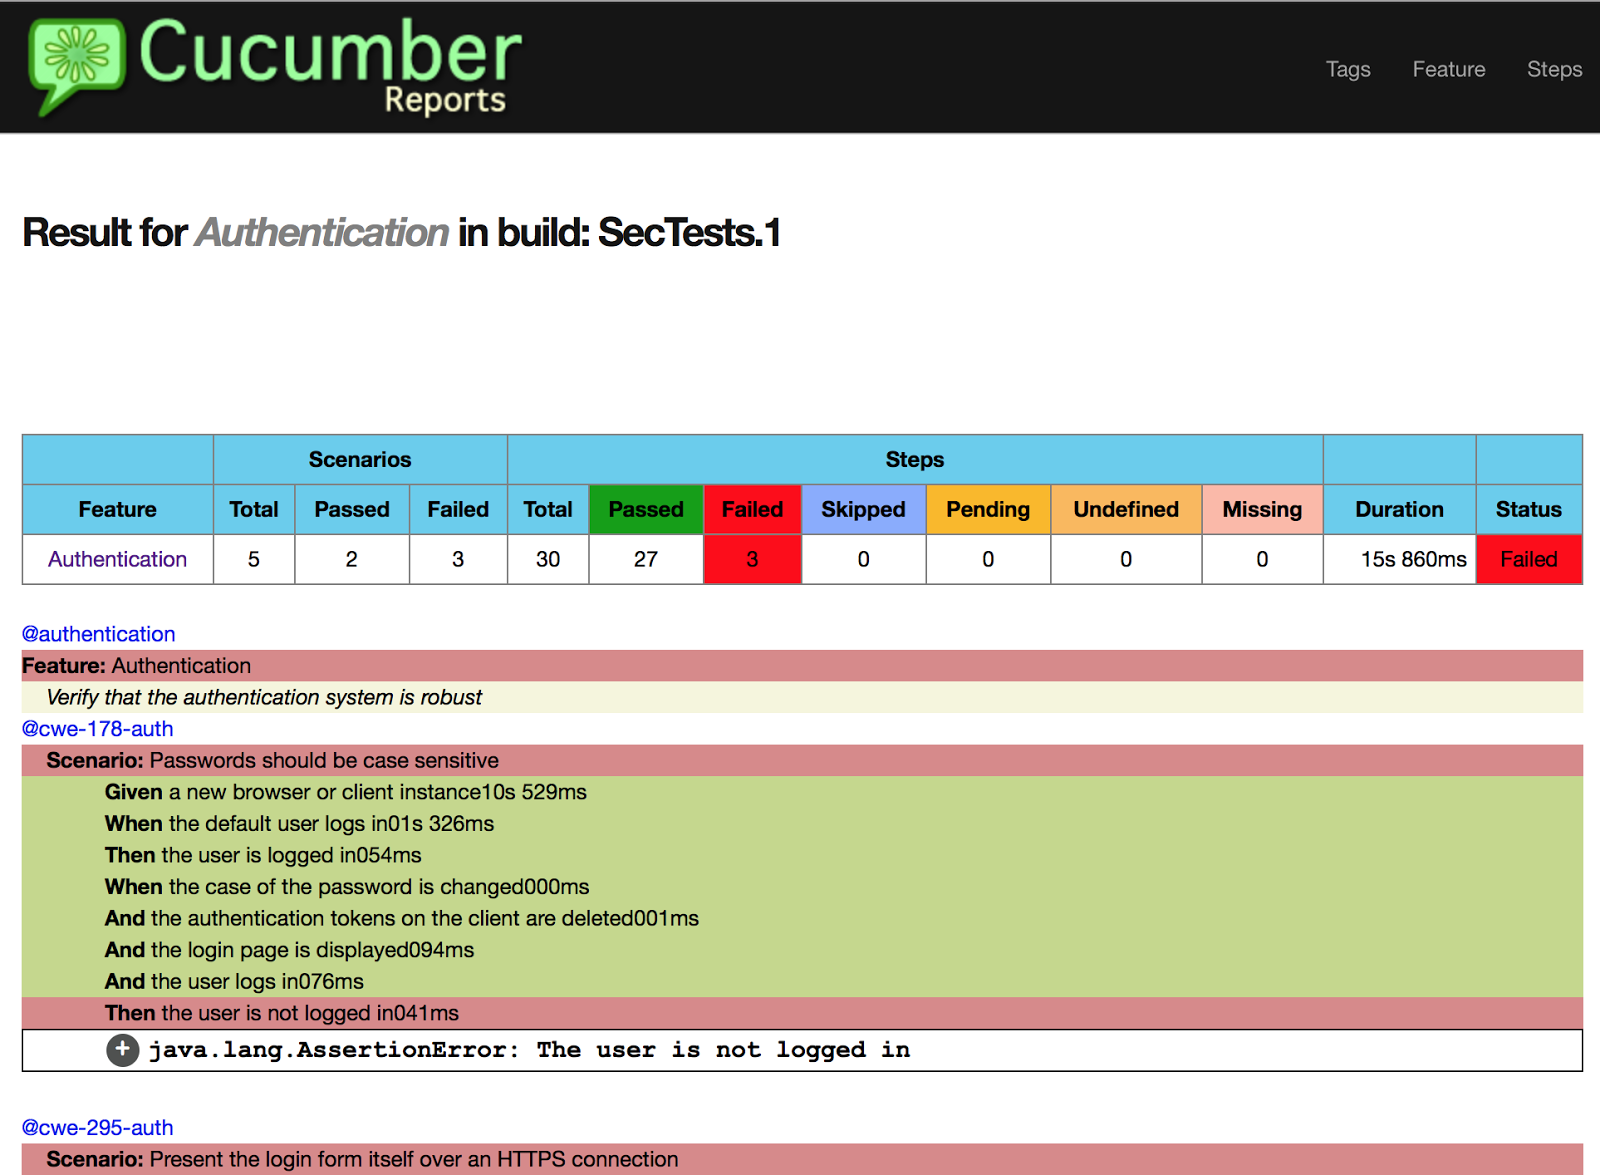
In this detailed report section, all of the executed scenarios are displayed. Those tests that have failed are marked as red and contain an explanatory message.
How was it able to test the RopeyTask Application?
You might have wondered, how bdd-security was able to test the RopeyTask application including very specific authentication related tests without us having specified URLs, passwords and actual login flows. Let's solve this mystery by opening the bdd-security/config.xml file.
The config.xml file specifies all the necessary parameters for the test suite to run against a specific application. In line 3, the base URL is defined, which by default points to http://localhost:8080 where the RopeyTask application is running. Line 8 defines the cookie value that holds the sessionID and line 11/12 contain the default credentials used to login to the target application.
Line 5 specifies the Java file containing the Selenium steps required to perform some deep dive tests related to authentication and authorisation. The Java file can be found at bdd-security/src/test/java/net/continuumsecurity/examples/ropeytasks/RopeyTasksApplication.java.
I've extracted only two methods from that Java class, openLogin and login. These methods are called whenever a scenario executes the "When the default user logs in" step. The openLogin method browses to the login page and waits until it is rendered. For the RopeyTasks application, that page is http://localhost:8080/user/login. Once the page is loaded, it executes the login method that looks for the DOM element with the respective IDs username and password and then fills in the default username and password as specified in the config.xml file. Finally, it looks for the DOM element with the name _action_login and attempts to click that element. All of this corresponds to the actual HTML source of the RopeyTask login page.

Let's run this against WebGoat
Alright, we have a pretty good understanding of BDD-Security now and to further progress start making it work on another web application. WebGoat is the clear choice for that task, so dive into it.
Let's close the RopeyTask application, download WebGoat and fire it up.
Browse to http://localhost:8080/WebGoat/login.mvc to verify that WebGoat is running, then run the same command we have run in the beginning (./gradlew -Dcucumber.options="--tags @authentication --tags ~@skip" test). Finally, open the new cucumber report that was generated.

The generated report looks very different and in fact all the scenarios of the authentication feature have failed. Drilling down further, we can see that all of the scenarios failed at the same step - when the user is supposed to login to the application.

The error message states that there was a timeout when waiting for the element with the id username.
Let's fix that by modifying the BDD-Security defaults starting with the config.xml file.
Update the baseURL to point to the new WebGoat URL and make sure that there is a trailing forward slash. Change the class to point to the new file - we'll create this in a moment. Finally, modify the username and password to guest/guest, which are the defaults for WebGoat.
Before we write the Selenium steps we have to take a look at the HTML code of the WebGoat login page and identify the key elements that we have to modify. See underlined in red below.

Against best practices, the button tag doesn't contain an ID or Name, but we'll figure out a way to make the steps work anyway.
Create the Selenium steps Java class
Create a new file at bdd-security/src/test/java/net/continuumsecurity/WebGoatApplication.java with the following content.
The method openLoginPage in line 20 is very straightforward and merely requires the name of the WebGoat login page (login.mvc) and the ID of an element that we expect to be rendered after the login page was called.
The method login can be copied from the RopeyTasksApplication.java for the most part. However, the button neither has a ID nor name, so we have to call it by naming the tag directly. This could be tricky if it's not the only button element on the page, but fortunately we can solve this issue like shown in line 32. The methods isLoggedIn and logout are required for the class to compile, but can be ignored for our current objective.
Now all that's left to do is run the tests (./gradlew -Dcucumber.options="--tags @authentication --tags ~@skip" test) and look at the results.

Excellent, most of the steps are passing now and the login step is now working as expected.

Conclusion
We have only scratched the surface of BDD-Security, but it is a really powerful tool. It is especially useful for codifying security requirements in a generic way and make it testable at runtime for a large range of applications. A proficient selenium user can probably translate the login functionality of an application in a few minutes. It is definitely not a silver-bullet, but provides a key foundation to automate the testing of security requirements and further empower QA folks.
I'm interested to know of any case studies where BDD-Security was used with a large portfolio and hear about any pros & cons that you have discovered.